
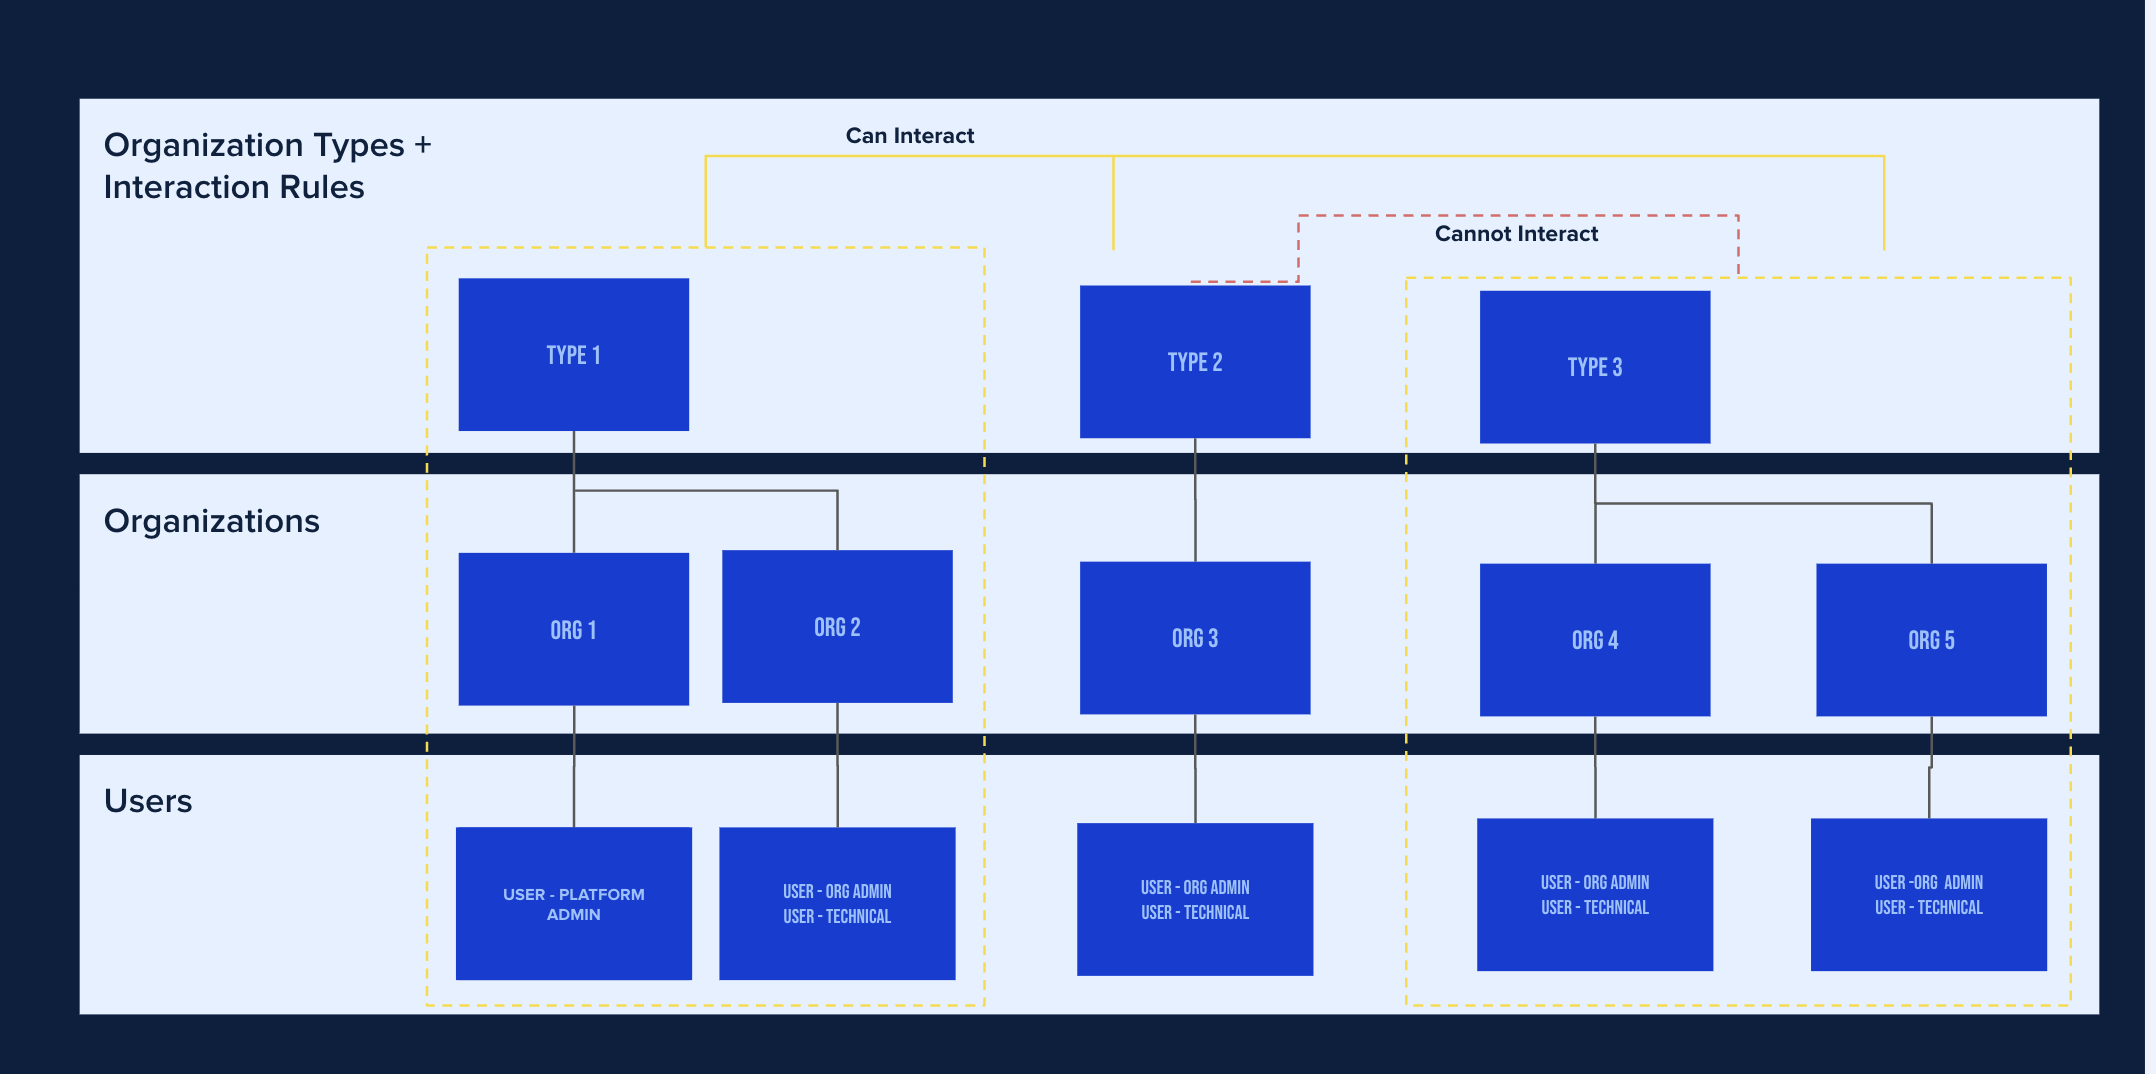
The three key components to your platform are Organization Types, Organizations and Users.
Organization Types are groups of Organizations and are used to control how Organizations can view and interact with other Organizations.
Organizations are groups of users and can be used to represent a team, department, legal entity or brand. Organizations can be grouped into different types to control the other organizations they can see and interact with. Organizations house the users on your platform.
Users can see everything inside their Organization and depending on their Organization type, other Organizations. A User only belong to one organization and has a set of roles assigned. These roles determine what they can do on the platform, for example, whether they can create data products.
Below is a general overview of the platform architecture.
Organization Types
Organization Types are the mechanisms by which you define the rules of interaction across your platform. Ecosystem Administrators can define Organization types to determine the visibility and privacy shared between organisations.
You may create up to 20 organization types for your platform (can be raised by Support if necessary). It is recommended to retain a small amount of organizations to most effectively manage the ecosystem.
Users may choose to define their organization in a variety of ways. You may wish to follow this format:
-
Host (your Organization as the platform owner)
-
Customer or Partner
-
Support (i.e. Harbr)
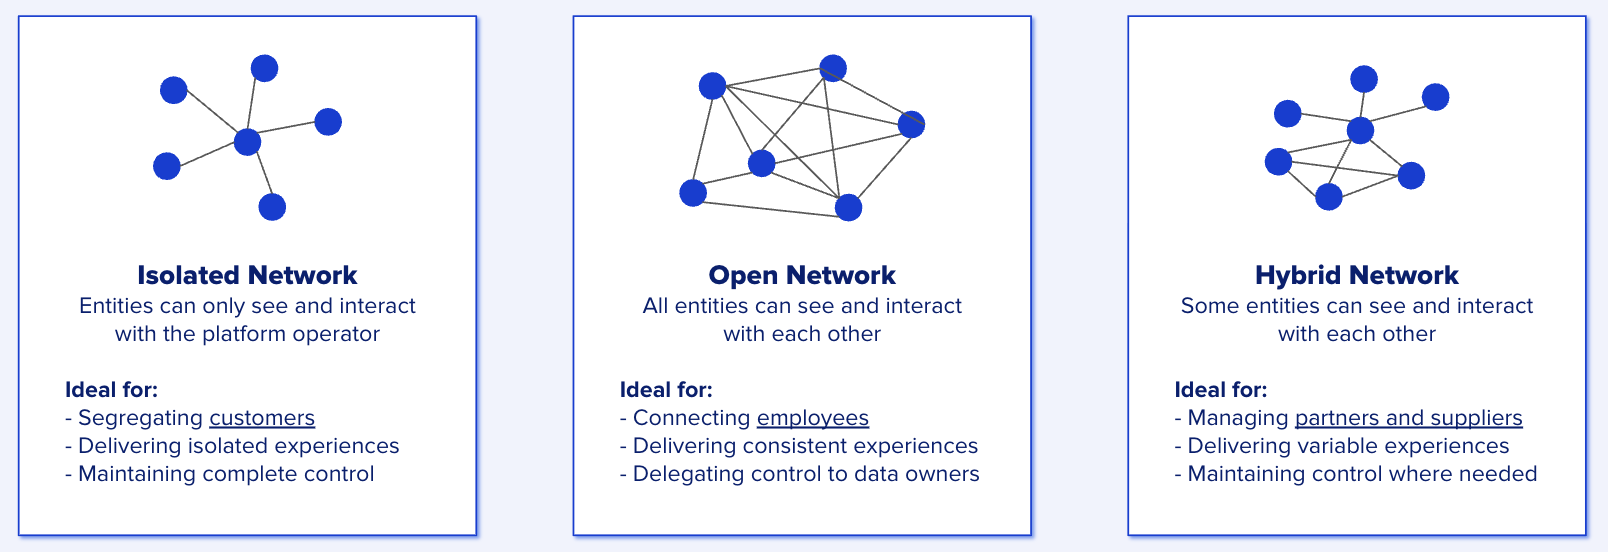
Alternatively, you may wish to define your organizations to interact in a ‘clean room’. In this event, no partner organisation will see any other partner organizations across your platform.
Organization Types enable a range of operating models, such as:
You must have an Ecosystem Administrator role to create Organization Types.
Create Organization Types
-
Go to the Ecosystem Icon on the top left of the platform.
-
Click Platform Administration
-
-
Click on the Organization Types tab.
-
Click on Create Organization type.
-
Create a new Organization Type by giving it a name.
-
A list of other Organization Types is displayed - select how your new type interacts with the other organization types by activating or deactivating the interaction the buttons.
Delete Organization Types
-
Go to the Ecosystem icon on the top left of the platform.
-
Click Platform Administration
-
-
Click on the Organization Types tab
-
Select the drop down arrow
-
Click Delete
-
Click Delete to confirm deletion of the Organization Type.
You must disable all interaction that the Organization Type has with an Organization. It is necessary to ensure that no Types are allocated to an Organization to complete its deletion.
Organizations
You must have an Ecosystem Administrator role to create Organizations.
Create Organizations
Creating an Organization allows you to invite users to join your platform. Firstly you must define how you want each type of group to interact with any other type.
If you invite a user with an Organization Administrator role then, they will be able to manage the organization details once they have registered.
-
Go to the Ecosystem icon on the top left of the platform
-
Click Platform Administration
-
-
Click on the Organization tab
-
Click on Create Organization
-
Create an Organization name
-
Select the Organization type from a pull down list
-
Select product tagging (Optional)
-
Enable product creators in the Organization to tag their products when they create a product to help users find their products. If you wish to enable this, then first define the categories and tags you would like them to use.
-
-
Create Organization Description
-
Insert Subscription contact details and Address
-
Click Create.
If you want this Organization to be part of your SSO configuration, please contact Support.
Manage Organizations
You must have an Ecosystem Administrator role to manage Organizations across the platform. Alternatively, with the Organization Administrator role, you can manage the details of your own Organization.
It is unlikely that you will need to edit Organizations frequently, but in the case that you do:
-
Click on the Ecosystem or Organization icon on the navigation bar.
-
Click Organization Administration
-
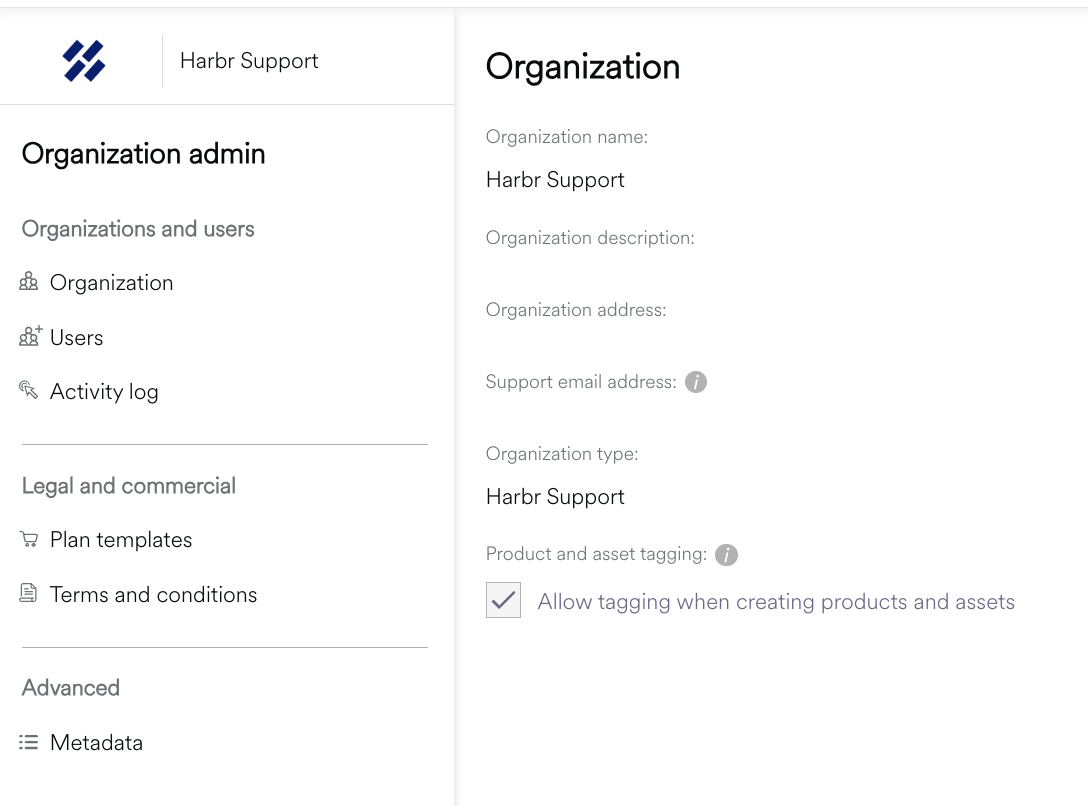
If you are an Ecosystem Admin, you may click into Organizations and edit their details through the Platform Administration icon. Organization Admins can determine whether an Ecosystem Admin is able to invite users to their Organization by ticking (or unticking) the box in the ‘Edit Organization’ view.
-
-
Click the three-dot menu > edit
-
Go to the Organization tab.
-
Edit the Organization Name.
-
View the Organization Type which has been set by the platform owner and defines how your organization interacts with others.
-
Edit Details to allow producers in this organization to add categories and tags to data products (if available).
-
Edit the Logo according to the required image sizes.
-
Edit the Organization description.
-
Edit the Support email address which is important so that consumers of any data products from your organization know where to seek help.
-
Edit the Subscription email address where requests for a subscription are sent if the channel is set to ‘managed.'
-
-
Edit Users to allow Ecosystem administrators to invite users to the organization. If this is disabled, only users with the Organization admin role are able to invite users to the organization.
It is not currently possible to delete Organizations via the UI, so contact support to do so.
Users
Users are invited to join the platform and are enabled to use selected features based on the allocation of specific roles. A user can be invited with no roles, such of which can be added or removed at a later date by following these steps.
Remember: Organization Admins may determine whether an Ecosystem Admin is able to invite users to the Organization by ticking (or unticking) the box in the ‘Edit Organization’ view.
Invite Users
To invite a user:
-
Click on the Organization logo on the navigation bar.
-
If you also possess the Ecosystem Administrator role, you will encounter both ‘Platform Administration and 'Organization Administration’.
-
-
Click Invite New User.
-
Enter the user’s first name, last name and email address.
-
Send out bulk invitations in batches by pressing + Invite another user.
-
Click Next and Select the appropriate type depending on the required visibility of the user.
-
Click Next.
Select user roles dialog box appears. -
Select the required user roles by double-clicking or dragging and dropping the role chip options from the Select user roles column.
-
Click Invite to send the users an email with instructions for registering on the Platform.
-
Toggle between a view of Active and Invited users to know who has registered and who might need a follow up. If you need to re-invite a user then please contact Support.
If you need to re-invite a user before the original email invitation has expired then no new invite is sent and an error will be raised. The invitation must have expired before being able to send another.
If you would like the users within your Organization to access the Platform via Single Sign On (SSO) then please contact Support.
Whitelist Domains
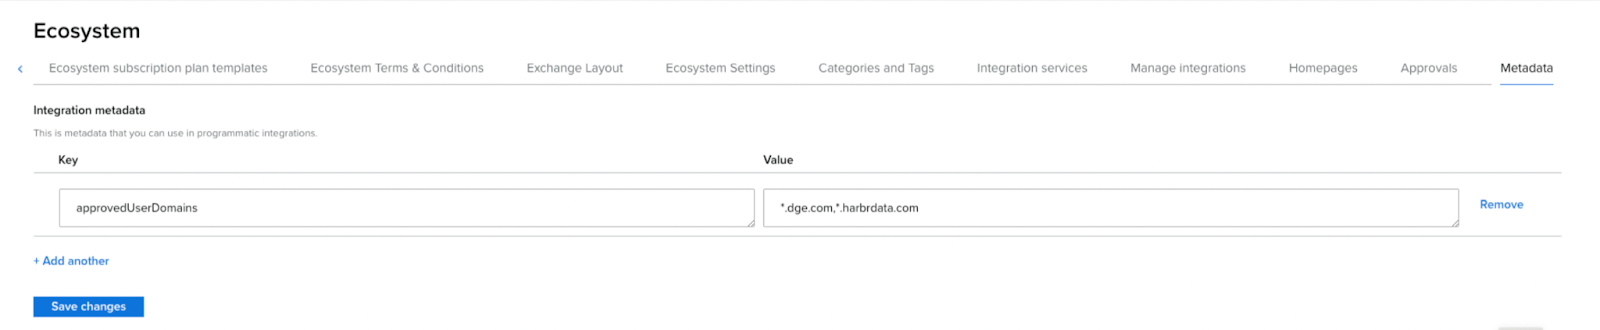
Ecosystem Administrators are able to restrict platform invitations to only allowed email domains, as an optional capability. To configure this:
-
As an ecosystem administrator, the Metadata section in the Ecosystem Management area
-
Add a new setting with the following values
-
Key: approvedUserDomains
-
Value: any domains that you to be approved for invites. Examples:
-
*.domain.com
-
-
Values can be updated at a later time if new domains needed to be added
Once values are set, each time user is invited to a platform a check will be performed and invite won’t be able to progress unless email domain is in the allowed list.
Passwordless Sign-In
As of 5.34, platforms can be configured so that users sign in with a one-time code sent to their email address, instead of a password. Passwordless sign-in is not available on all platform configurations. If required, please contact your Harbr Account Manager.
Passwordless sign-in is not supported on platforms that use Microsoft Entra ID for sign-in.
On a platform with passwordless sign-in:
-
The sign-in screen asks only for an email address. There is no password field.
-
The user receives an email containing a one-time code, then enters the code to sign in. The code expires after five minutes. If a code is invalid or has expired, the user can request a new one.
-
Users whose email domain uses Single Sign On (SSO) are sent to their SSO provider, as today.
-
Users who already had an account before passwordless sign-in was enabled keep their account, Organization and roles. They do not need to reset a password or register again.
-
Invited users receive an invitation email telling them to sign in with their email address. There is no step to set a password.
-
Changing a password from the user profile is not available.
-
Someone without a platform account cannot sign in, unless self-registration by email domain is enabled and their email domain is approved.
The invitation email and the one-time code email are separate. The invitation tells a new user they have been added to the platform. Each time they sign in, they receive a separate email containing a one-time code.
Self-Registration by Email Domain
As of 5.34, platforms can allow users from approved email domains to register themselves, without an invitation. Self-registration is not available on all platform configurations. For further detail, see Configuring Self-Registration by Email Domain, and please contact your Harbr Account Manager to discuss.
Self-registration by email domain is not supported on platforms that use Microsoft Entra ID for sign-in.
When self-registration is enabled:
-
Each approved email domain is mapped to an Organization. A new user whose email domain is approved receives an account in the mapped Organization the first time they sign in.
-
A wildcard entry can be configured, so that new users from any email domain that is not listed join a chosen Organization.
-
A new user whose email domain is not approved, and is not covered by a wildcard, cannot sign in and no account is created.
-
On platforms with password sign-in, the new user creates an account using their email address and sets a password.
-
On platforms with passwordless sign-in, the account is only created after the user has entered the one-time code sent to their email address, confirming they own it.
-
New users receive the default roles configured for self-registration. If none are configured, they receive the General role.
-
No invitation email is sent.
-
On their first sign-in, new users are asked to enter their first and last name.
-
Existing users sign in as normal. The email domain check never blocks an existing user.
Self-registration is configured separately from the approved invite domains described in Whitelist Domains above. Invitations continue to follow the approved invite domains.
When self-registration is not enabled, the platform remains invite-only.
Delete Users
Ecosystem Administrators can delete a user from the platform from Platform Administration. Access is revoked immediately, and everything the user created is retained. Users who were invited but never accepted or registered can also be deleted, and re-invited if needed.
For full guidance, see Delete a User.