Overview
The Homepage is the landing page that users see when they log in to your platform. It can be configured by users with the Ecosystem Administrator role and is designed to highlight featured content, showcase key data products and assets, and provide quick access to popular or new items on the Exchange.
Your homepage can include featured messaging, selected content, images, and call-to-action sections that guide users toward engagement.
Assigning Homepages
Eco admin role has permission to create and manage homepages:
-
A Homepages menu item is visible in the eco admin area
-
The Homepages menu item navigates to a list of all homepages within the ecosystem
-
Any eco admin can open, edit and publish changes to any homepage.
To ensure that an organization is directed immediately to your homepage, you can assign it from either of the following locations:
-
During creation – select one or more organizations in the Create Homepage form.
-
From an existing homepage – click Edit Organizations from the homepage settings.
Note: A single organization cannot be allocated to more than one homepage.
If no homepage is configured for a specific organization, users in that organization will default to the Exchange view.
As a user viewing the homepage, in addition to the content published, user-level visibility applies:
-
The user only sees the products that are visible to them
-
For recently updated and recently added product sections, the user sees the top X (limit set in manage config) products displayed, but only those that are visible to them
-
-
The user only sees the assets that are visible to them
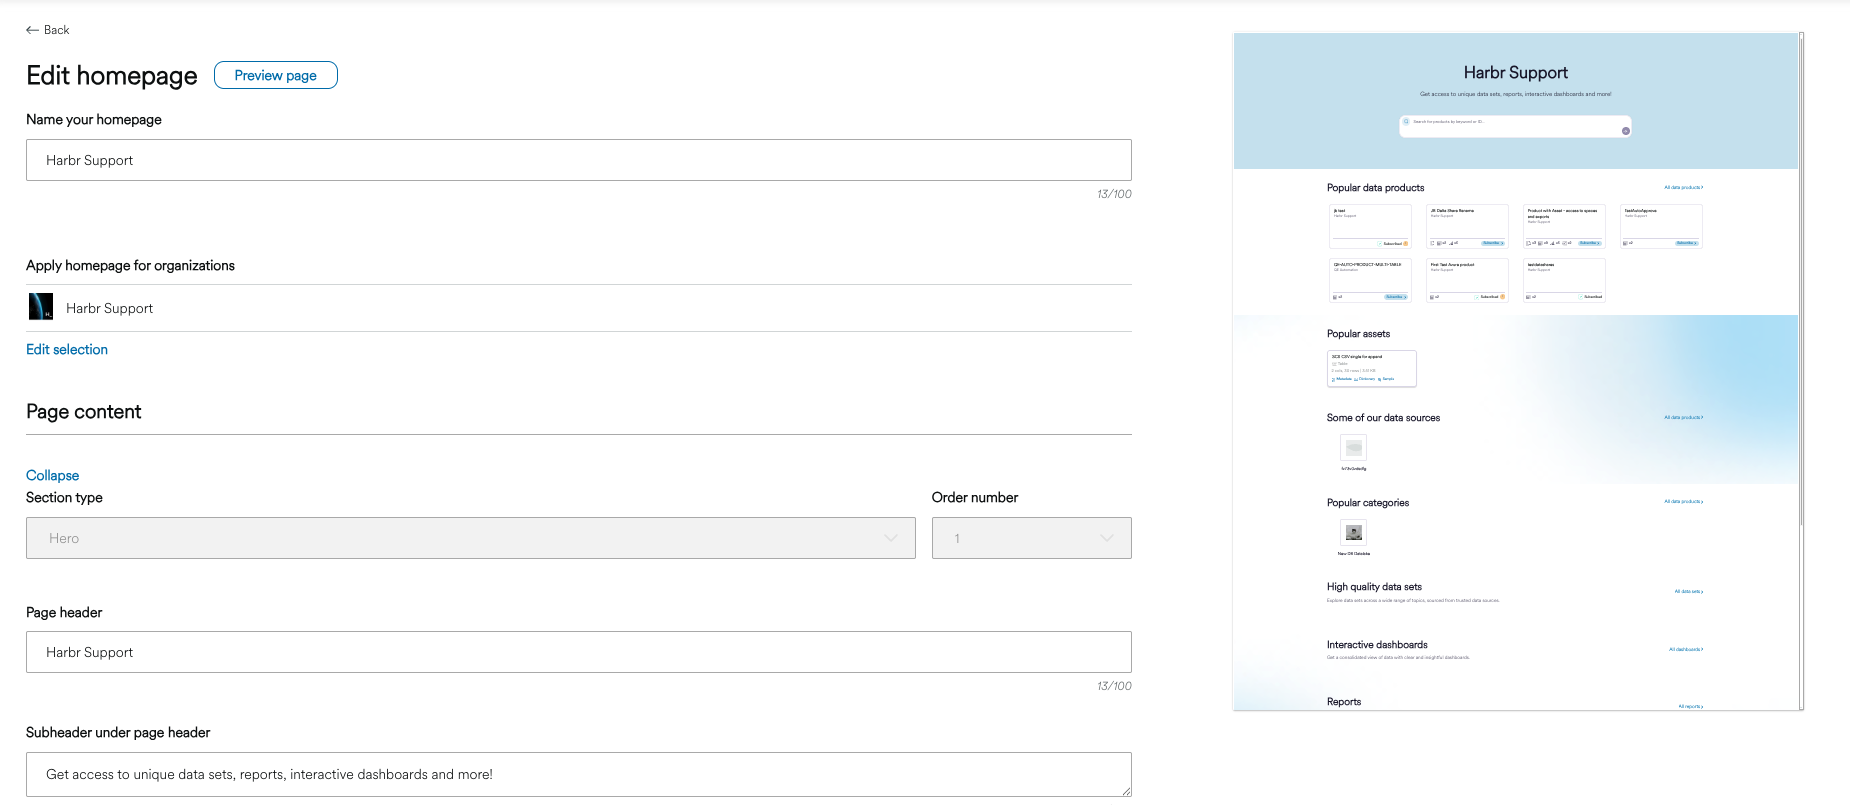
Homepage Builder
Ecosystem Administrators can now use a form-style Page Builder to structure and populate homepages, replacing the previous JSON editor. It is accessed in the ‘Homepages Tab’ of the Ecosystem Administrator view.
The Page Builder provides an intuitive interface to add, reorder, and preview homepage sections in real time. A live preview pane is available on the right-hand side, allowing you to see updates before publishing. You can also use the ‘Preview’ button to access a pop-up screen view before publishing.
-
The only requirement to publish the page that the form validates is to provide a homepage name
-
The only section that exists by default is the hero section: the user can decide the order of all sections by selecting an order number, with the exception of the hero section - which is fixed as 1
Section Types
You can add the following section types to your homepage:
|
Section Type |
Description |
|---|---|
|
Selected Products |
Highlight specific products, each linking to its individual product page. |
|
Recently Added Products |
Display products that were most recently added to the Exchange. |
|
Recently Updated Products |
Display products with the most recent releases or data refreshes. |
|
Selected Assets |
Highlight specific assets, each linking to My Collection. |
|
Selected Categories and Tags |
Display categories or tags that link to their corresponding pages on the Exchange. |
|
Call to Action |
Add a block containing an image, text, and button to encourage user action (e.g., “Explore the Exchange”). |
The Recently Added and Recently Updated sections are dynamic, driven by product release and update timestamps.
Example Homepage
A data marketplace administrator wants users from the Finance Organization to see a curated homepage highlighting top-performing data products and new releases.
They create a homepage featuring:
-
A Call to Action banner with “Explore New Finance Data Sets”
-
A Recently Updated Products section to surface the latest refreshed content
-
A Selected Categories section linking to Finance, Risk, and Treasury tags
Once published and assigned to the Finance Organization, all members of that org will land on this homepage when logging in.
Create a Homepage
Follow these steps to create a homepage:
-
Click the Ecosystem Icon on the navigation bar.
-
Select Homepages.
-
Click Create Homepage.
-
Select the organizations that should see this homepage.
-
Note: an organization cannot be assigned to more than one homepage.
-
-
Add sections and reorder them as needed using the Page Builder interface.
-
Use the live preview on the right-hand side to view updates, or click Preview next to Save Changes to open a pop-up preview.
-
Click Save and Publish to make your homepage live.
Considerations
-
The user can add as many sections as they wish
-
The user can delete all sections except the hero section
-
The user can cancel at any time to close the pagebuilder
-
The user can preview the page (live in the side ‘mini preview’, or using the ‘Preview page’ button to open a new tab
-
What an eco admin sees in preview is dependent on the current user - i.e. Admin A could have a different preview view than Admin B
-
-
When creating the homepage and adding assets and products to sections, as an eco admin you can select from the following:
-
All the assets in the GET/manage/assets response that are “live”
-
All the products in the GET/manage/products response that are “live”
-
Manage Homepages
Manage or edit homepages:
-
Navigate to Homepages from the Ecosystem Admin Bar.
-
The list view displays all created homepages and their assigned organizations.
-
Each homepage includes the following metadata:
-
Created
-
Created by
-
Last Modified
-
Last Modified by: User name
-
Configuration Code
-
Applies to: Assigned organizations
-
-
Click the three-dot radio button beside a homepage to:
-
Edit – opens the homepage in the Page Builder
-
Delete – permanently removes the homepage configuration
-
Homepage Sections
|
Hero sections: When editing a hero section, the user can add:
|
|
Selected product sections: When editing a selected products section, the user can add:
When viewing the published homepage, users can click on each product tile to view its Exchange product page. |
|
Recently added products sections When editing a recently added products section, the user can add:
The behaviour for this section is that the section will list the products with the most recent release timestamps, from most recent (first) to last recent (last), up to the limit number that is set for the section. When viewing the published homepage, users can click on each product tile to view its Exchange product page.
|
|
Recently updated products sections When editing a recently updated products section, the user can add:
The behaviour for this section is that the section will list the products with the most recent update/refresh timestamps, from most recent (first) to last recent (last), up to the limit number that is set for the section. When viewing the published homepage, users can click on each product tile to view its Exchange product page. |
|
Selected assets sections When editing a selected assets section, the user can add:
When viewing the published homepage, users can view metadata, dictionary and sample - and click through to the asset on My Collection, if they have permissions. |
|
Selected categories / tags sections When editing a selected categories or tags section, the user can add:
When viewing the published homepage, users can click on a category and tag which links them to a filtered view of the Exchange in the same tab. |
|
CTA sections When editing a CTA section, the user can add:
|
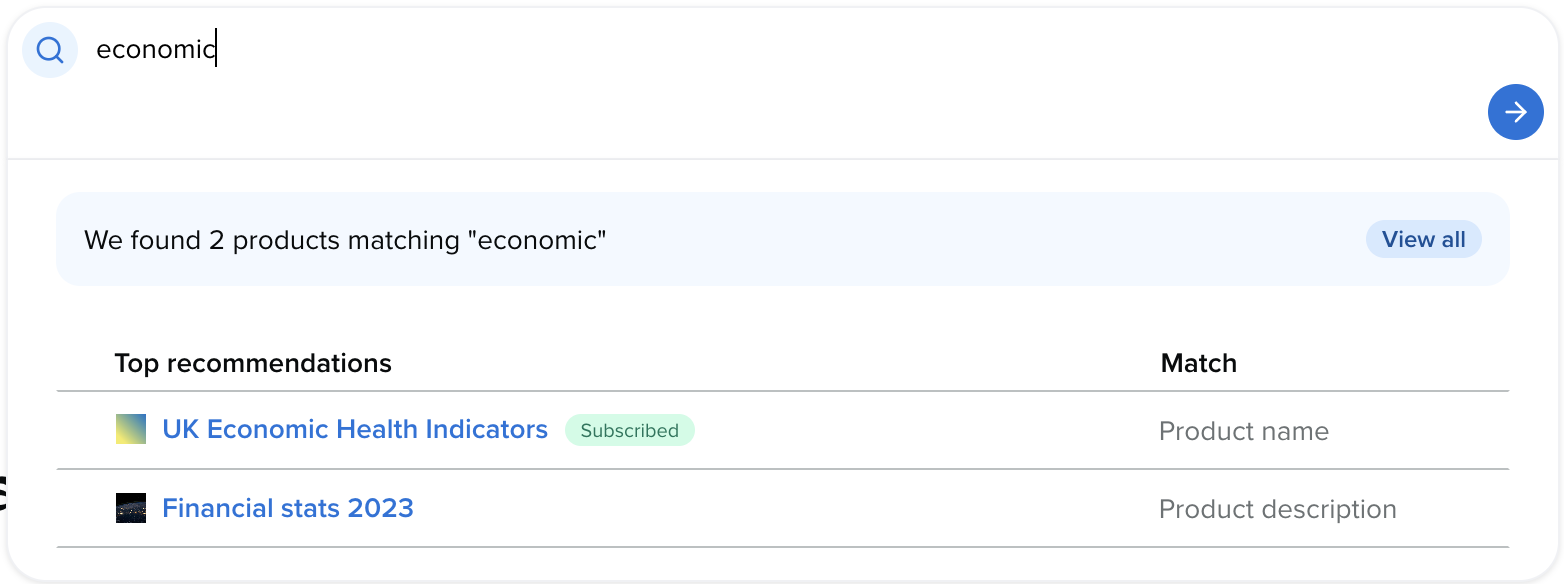
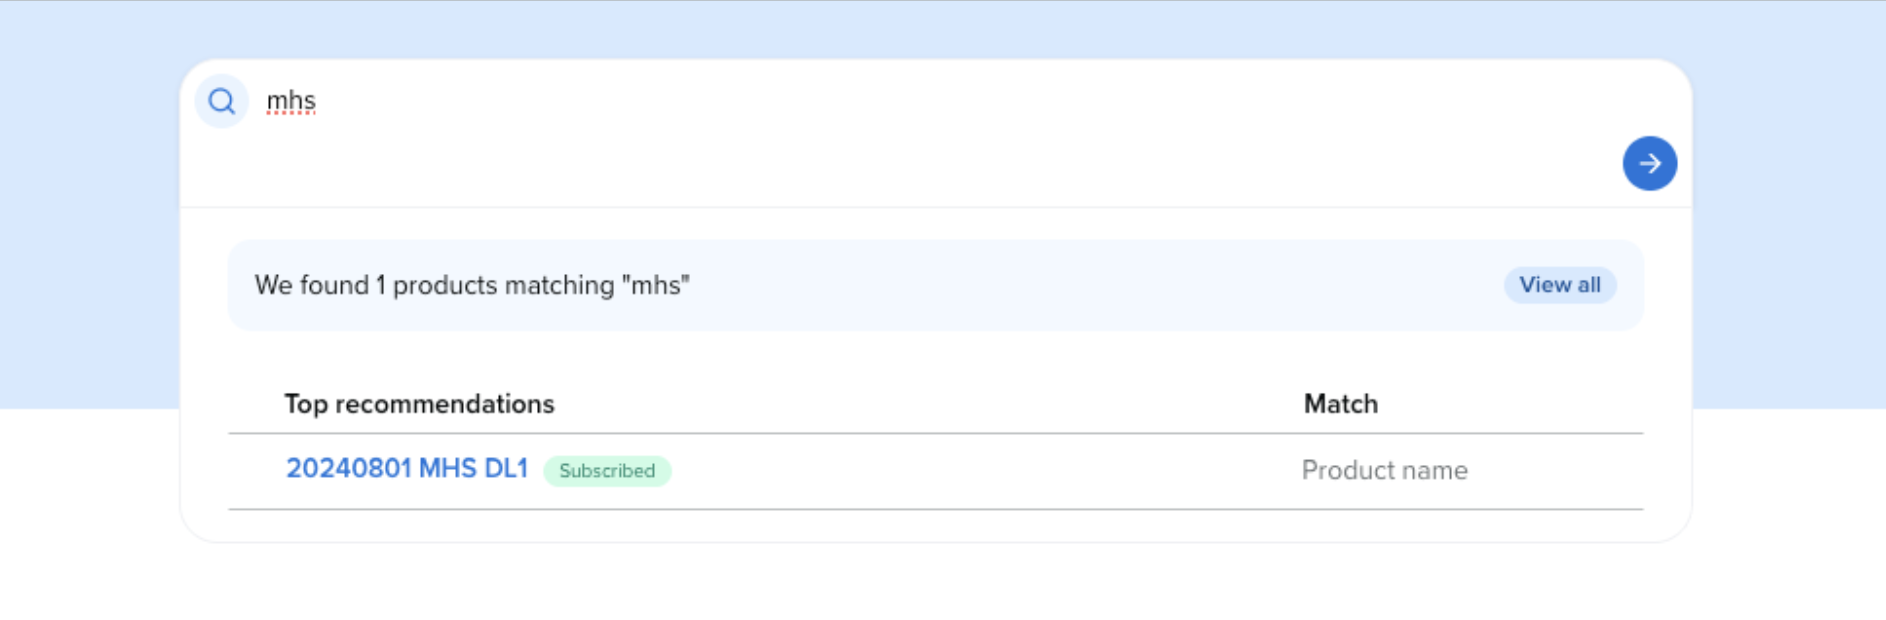
Product search is available as a homepage hero section. When enabled, a search input appears that allows users to find products directly from the homepage.
Product Search
Product Search enables a more intent-based discovery of data products on the Exchange. Consumers can discover suitable products without knowing the exact product name and searching for properties that are available for products and assets.
Filters, categories and tags help narrow marketplace content, but users still have to manually browse and compare products. Product Search removes that friction, it's fast, intuitive, and works the way users already think, with no learning curve required.
What Search Enables
For Producers
-
Higher Conversion: Reduces the gap between product interest and subscription, turning demand into consumption.
-
Revenue Growth: Enhanced discovery leads to more subscriptions and incremental revenue opportunities.
-
Increased Visibility: Captures intent-based traffic, ensuring products are found based on their value rather than just their name.
For Consumers
-
Accelerated Insights: Cuts down browsing time, surfacing relevant products immediately.
-
Lower Barriers: Removes the need for prior knowledge of specific product IDs or naming conventions.
-
Reduced Noise: Moves beyond basic categories and tags to find specific data points.
How Search Works
The Search matches to the following attributes:
-
Product display name
-
Product short description
-
Product ID (limited to whole attribute match only)
-
Asset display name
-
Asset description
-
Asset ID (limited to whole attribute match only)
-
Column name
-
Column description
Products are returned if the assets they contain match.
Ranking is based on several factors that include the following:
-
Property Weighting
Not all matches are created equal. We assign higher importance to matches found in fields like titles, compared to deeper metadata like column descriptions. The order of importance is:
-
Highest - Product display name
-
Asset display name
-
Product short description
-
Asset description
-
Column name
-
Column description
-
Product packaging metadata
-
Asset packaging metadata
-
Match Accuracy
The system evaluates how close the matching property is to the user’s search terms. This ensures that precise matches outrank "near misses." This includes:
-
Full Phrase Matching: Exact matches are given the most weight.
-
Partial & Fuzzy Matching: Our search accounts for minor typos or incomplete words, ensuring you still find what you need even if the search term isn't a 100% character match.
-
Match Density (Frequency)
The volume of matches within a single product significantly influences its position. If a product or its underlying assets contain multiple mentions of your search term (e.g., "Transport" appearing in five different column names), that product will be ranked higher than a product where the term appears only once.
-
All search outputs are centered on data products.
-
Scans both product and asset-level metadata.
-
Supports full phrase, partial, and fuzzy matching.
-
Prioritizes results based on match strength and attribute depth.
This ensures:
-
Strong intent matches rise to the top
-
Weak or incidental matches are deprioritised
-
Results feel accurate and immediate
Product Search can also be accessed the Search bar in The Exchange.