Databricks
Databricks can be used in various ways on the Harbr platform:
As an underlying data platform and cloud solution underlying the platform. In this way, users can store on-platform assets, share data through Delta Sharing and provide processing/compute for Export, Spaces and Query features.
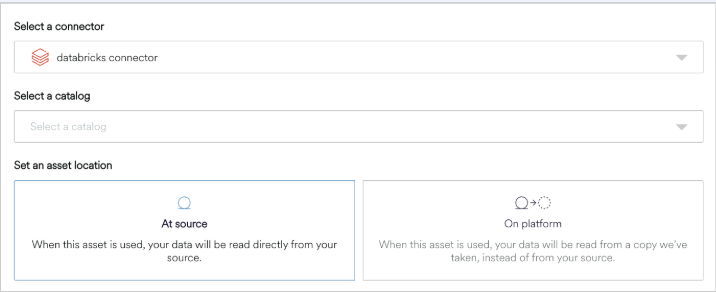
As a standalone data connector to bring data on and off the platform. If the Databricks connector is configured to support the ‘at source’ asset location, At Source assets can be created from it and used to create Delta Shares (both for the specific asset and as part of the product). Assets created in this way can not be used in Spaces, Query or Export.
Pre-requisites
To connect Harbr and Databricks you will need:
A Databricks account with the following permissions:
Permission | Status |
|---|---|
Clusters |
|
Jobs |
|
Cluster Policies |
|
DLT |
|
Directories |
|
Notebooks |
|
ML Models | Not required |
ML Experiments | Not required |
Dashboard | Not required |
Queries |
|
Alerts |
|
Secrets |
|
Token |
|
SQL Warehouse |
|
Repos |
|
Pools |
|
Note: the above requirements may change depending on what Harbr features you intend to use. We recommend you consult with your Harbr contact before the configuration.
A Harbr account with the appropriate roles:
Default user
Organization Admin
Technician
Unity Catalog enabled on your Databricks Workspace. Unity Catalog is a unified governance solution for all data and AI assets including files, tables, machine learning models and dashboards.
To connect to a Databricks, you need:
An existing PAT token or 0Auth credentials with the appropriate permissions
USE Catalog on any of the catalogs you want to create assets from
USE Schema (for any schemas)
SELECT (either at a catalog, schema or table/view level - depending on the desired granularity)
READ VOLUME (as above - catalog, schema or volume level)
It Workspace access' and 'Databricks SQL access' a new user is being created for this purpose (these are usually defaulted ON if creating the user/identity from inside the workspace)
A Databricks Managed Service Account is required - Entra accounts are not supported
Click here for more information.
Create the Connector
Click Manage on the Navigation bar
Select Connectors to view the Manage Connectors screen
Click the Create connector button at the top right
Enter a Name for the connector and a Description (optional)
Select the Type > Databricks
Select Authentication and use:
A PAT token from Developer settings in user area in Databricks,
See details on how to generate token (https://docs.databricks.com/en/dev-tools/auth/pat.html )
Currently the only supported token type is Databricks personal token authentication
or OAuth using a service account number
Remember to grant required service account permissions on catalogs / schemas / SQL warehouses etc).
Note: The Service account must also have permissions for Use Tokens. For more details, see https://learn.microsoft.com/en-us/azure/databricks/security/auth/api-access-permissions#get-all-permissions
Enter Host - this is the workspace URL e.g.
https://adb-1535878582058128.8.azuredatabricks.net (check that there is no trailing ‘/’)\Enter the Client ID (generated in Azure, also known as Service Principle UUID)
Enter the Client Secret Value (shown once, visible once generated in Azure)
Add any Integration Metadata * needed for programmatic integrations
Key will be ‘httpPath’ (check case)
For the value, navigate to Databricks workspace, select ‘Compute’ on the left hand menu,
‘SQL Warehouses’ tab. Either select an existing SQL Warehouse you would like to be used during asset copy step, or create a new one.
Note: There is no minimum Cluster Size recommended - but Small or Medium should be sufficient. The Platform will start and stop the warehouse, but feel free to configure an Auto Stop. No Scaling is required.
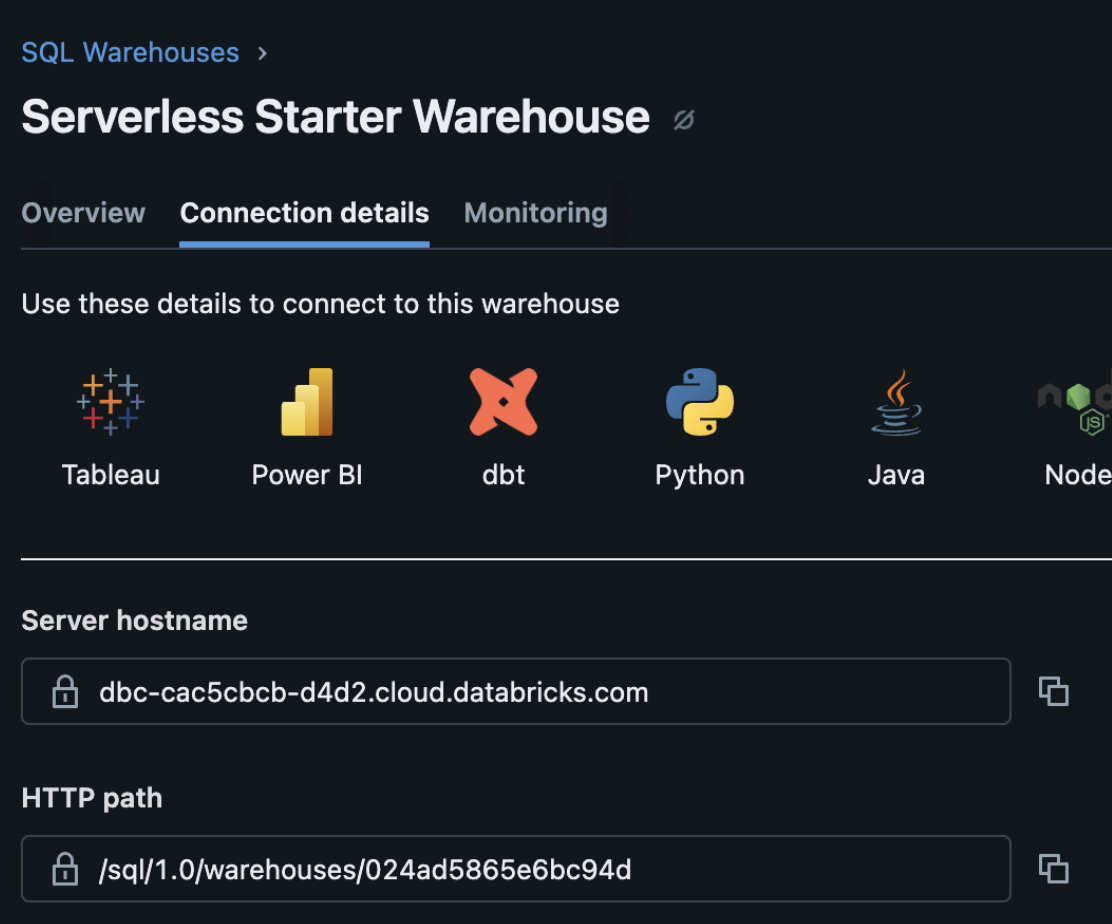
If using a Service Account for connectivity from the Platform, ensure the Service Account has permissions on the Warehouse. Click into the Warehouse and navigate to ‘Connection Details’ and copy the httpPath value e.g. ‘/sql/1.0/warehouses/7cff6770269b80c7’
>>Add this httpPath as the value for the Integration Metadata. This warehouse will be used when loading data from your databricks instance.
Click the Create button to create your Connector
Those items marked with an * can be edited after the Connector has been created
The details will be validated and we will display what capabilities the connector can perform in the platform with the given permissions
Capabilities | What it allows to do |
|---|---|
catalog |
|
access |
|
jobs |
|
clusters |
|
resources |
|
Identity Configurations
To complete identity configuration for a Databricks connector, certain Identity configurations must occur. The service account must be a user (or in a group) that has been added to your Databricks workspace. This ensures it has a valid identity to authenticate and receive the necessary entitlements.
Ensure the service account has the Databricks SQL Access entitlement enabled for the workspace. Without this, it cannot use SQL Warehouses to run queries.
In addition, the following Catalog & Table permissions must apply:
The identity must have permission to
USE CATALOGon each catalog that contains the data we need to read.The identity must have
USE SCHEMAon the relevant schemas so the account can explore themThe service account needs
SELECTprivileges on each table from which we will read data. This ensures it can run queries against those tables.
Finally, a Databricks SQL Warehouse must be created (or already exist) for the platform to query your data. To set this up, follow this guide.
To access SQL Warehouse, the service account needs permission to attach to or run queries using that particular SQL Warehouse. Note that in the image below, the ‘ws-az-demo-admin’ is the SQL warehouse, with permissions set to ‘can use’.
You can view the status of your data product updates at any time.
Summary: The service account must (1) be recognized in your workspace, (2) have Databricks SQL Access, (3) hold USE CATALOG & SELECT privileges on relevant data, (4) have permission to query the designated SQL Warehouse, and (5) supply a valid token or principal credential.
Configure Organizations
Each organization can be configured to use different a Databricks warehouse to store and process the data. To do this:
Go to Organization Administration
Go to Metadata tab
Add an entry with the following key/value pair.
There are two main values to configure:
upload_platform: Azure connector that will be using for file processingprocessing_platform: Databricks connector that will be used
You can get the connector unique identifier from the url:

key: harbr.user_defaults
value:
{
	"consumption": {
		"catalogs": [
			{
				"name": "",
				"id": "",
				"connector_id": "",
				"databricks_catalog": "assets",
				"databricks_schema": "managed",
				"databricks_table_name": {
					"naming_scheme": "PESSIMISTIC"
				},
				"default": true,
				"access": {
					"share": {
						"default_ttl_minutes": "1200"
					},
					"query": {
						"default_llm": "",
						"default_engine": ""
					},
					"iam": {
					}
				}
			}
		]
	},
	"upload_platform":
	{
	"connector_id":"yourconnectorid"
	},
	"processing_platform":
	{
		"connector_id": "yourconnectorid",
		"default_job_cluster_definition": {
		}
	}
}
Your organization is now setup to use a Databricks connector.
Configuration to Support ‘At-Source’ Assets
At Source Databricks assets can be created from an appropriately configured connector and used to create Delta Shares (both for the specific asset and as part of the product). These specific assets will not support the following usage types: Export, Query and Spaces.
There are a number of differences for At Source assets compared to On Platform assets:
Sample Data - Returns the first set of rows in the table instead of a random sample
Metadata - We estimate the size instead of doing the full scan of the entire table at source.
Note: This is an Early Access feature, and is not readily available on all platforms.

Configuration Steps:
Both PAT and oAuth can be used as auth methods for the connector
The Service principal account that will be used for the connector requires the following permissions:
CREATE RECIPIENT (needed to define external data share recipients from the marketplace)
CREATE SHARE (needed to create new data shares on the above recipients from the marketplace)
USE RECIPIENT (needed to use existing share recipients in Unity Catalog (only in the case of databricks-to-databricks shares)
SET SHARE PERMISSION (needed to grant or revoke share-level permissions on the shares created on the marketplace)
Data Sharing permissions needs to be enabled on the platform
SQL warehouse needs to be set on the connector, by doing the following:
httpPath added as integration metadata on the connector with the value (e.g.
/sql/1.0/warehouses/024ad5865e6bc94d)The value can be found under Connection Details for the SQL Warehouses that you have available (HTTP path value)

